Introduction
Looking for a way to dispatch data to users using Spring WebSocket controlling when to send to everybody or to an user in specific, I've come across many examples using Spring Security. Spring security is not a bad thing, completely the opposite, it is very useful and needed in any application, but Spring it requires some effort in this kind of task I'm doing that is unnecessary as Spring forces the user to login so it can manage each user easily for you. Years ago I did the same thing(A application using WebSocket) for a college degree article using Play framework 2.1 and I did not need to add any kind of security for controlling the user so here I did not want to configure security as well, not at least with Spring Security. After 2 weeks of looking I finally found a thread in a brazilian forum teaching it in a simple way using STOMP. As it took me so much time to find it and it was the only working example I found, I decided to write this post giving a few more explanation because this forum thread only fix the user request problem and not teach how to start from ground zero and make your own WebSocket service yourself. So in this post I'll try to teach you how to make a simple Webchat using Spring WebSocket with STOMP without thinking about Spring Security.
WebSocket definition
A WebSocket is a connection between an user and the server that only closes when the user requests it or when something happens to the server that forces it to disconnects the user(be it hardware problem, the user being banned for doing innapropriate actions or the server losing connection). Another thing is, unlike a normal Http connection that is one way, that means, you request something and the server answers you using the same connection, in a WebSocket the connection is both ways, so you have one connection and a pool of users connected to the same place. So whatever request the server receives, all connected users will receive the response. Then what is WebSocket used for? For large stream of data such as video and audio like youtube, making it easy to buffer small parts of the video instead of sending it whole to the user. In normal connection you had to keep sending the video to the user and the more time it took for the video to load in the user browser or whatever device being used, the bigger the chance of timeout, not mentioning the overhead to keep this connection opened. More info here.
The problem ... and the solution
Wait... I said that there is a 'pool of users' connected to the server and wherever request is sent all users will receive the response, so how does it fit in a 'controlling when to send to everybody or to an user in specific'? Well ... of course, this is a program, a machine code, you can have control over the connections. Each connection is seen as a session by the WebSocket server, so you can send specific data to a specific user by using STOMP. STOMP just do for WebSocket what REST did to Http. You specify url-like structures bound to some class or function and whoever is connected to the WebSocket server can subscribe to these 'url' and listen so other users can send data at any moment and only who's listening to the specific route will receive this data.
Implementing
To start you need to be familiar with Java 7(or newer), Spring boot, WebSocket and STOMP. Thanks guys the tutorial is finished you already know what you need ^^.
Just kidding =D (it looks like some websites right bael...), but yeah the minimum here is knowledge in Java, Spring and Maven or Gradle(Even though I will use both for demonstration I won't explain how they work and I will focus more on Maven, if you don't have any of them installed, check this link to learn how to install maven or this link to learn how to install gradle), I'll try to make it easy explaning Spring things in as much details as possible, so if you never used Spring don't worry, you will still not know anything after this post, I mean, don't worry you will know at least how to set it up for a basic project.
First things first
Be sure that you have Java and Maven (or Gradle) installed. Create a directory (like spring_websocket_specific_user for example).
If you are using Maven create a file pom.xml in the root of your directory and copy the following to the file:
<?xml version="1.0" encoding="UTF-8"?>
<project xmlns="http://maven.apache.org/POM/4.0.0" xmlns:xsi="http://www.w3.org/2001/XMLSchema-instance"
    xsi:schemaLocation="http://maven.apache.org/POM/4.0.0 https://maven.apache.org/xsd/maven-4.0.0.xsd">
    <modelVersion>4.0.0</modelVersion>

    <groupId>org.websocket.spring</groupId>
    <artifactId>spring_websocket_specific_user</artifactId>
    <version>0.1.0</version>

    <parent>
        <groupId>org.springframework.boot</groupId>
        <artifactId>spring-boot-starter-parent</artifactId>
        <version>2.2.1.RELEASE</version>
    </parent>

    <dependencies>
        <dependency>
          <groupId>org.springframework.boot</groupId>
          <artifactId>spring-boot-starter-websocket</artifactId>
        </dependency>
        <dependency>
            <groupId>org.springframework.boot</groupId>
            <artifactId>spring-boot-starter-test</artifactId>
            <scope>test</scope>
        </dependency>
        <dependency>
            <groupId>com.jayway.jsonpath</groupId>
            <artifactId>json-path</artifactId>
            <scope>test</scope>
        </dependency>
    </dependencies>

    <properties>
        <java.version>1.8</java.version>
    </properties>

    <build>
        <plugins>
            <plugin>
                <groupId>org.springframework.boot</groupId>
                <artifactId>spring-boot-maven-plugin</artifactId>
            </plugin>
        </plugins>
    </build>
</project>
If you are using Gradle create a file build.gradle in the root of your directory and copy this:
buildscript {
repositories {
mavenCentral()
}
dependencies {
classpath("org.springframework.boot:spring-boot-gradle-plugin:2.2.1.RELEASE")
}
}
apply plugin: 'java'
apply plugin: 'eclipse'
apply plugin: 'idea'
apply plugin: 'org.springframework.boot'
apply plugin: 'io.spring.dependency-management'
bootJar {
baseName = 'spring_websocket_specific_user'
version = '0.1.0'
}
repositories {
mavenCentral()
}
sourceCompatibility = 1.8
targetCompatibility = 1.8
dependencies {
compile("org.springframework.boot:spring-boot-starter-websocket")
testCompile('org.springframework.boot:spring-boot-starter-test')
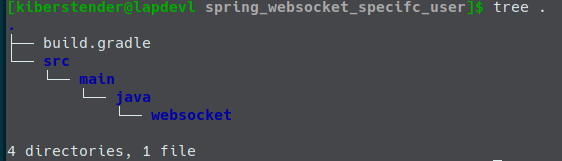
}These files will manage Spring dependencies for you downloading everything you'll need to make Spring work. Now, 4 dirs one inside the other: src, then main then java then websocket
Maven representation

Gradle representation
Creating your Main class
Now let's create the class who will start your program.
Go to /src/main/java/websocket and create a file named Main.java and add the following
package websocket;
import org.springframework.boot.SpringApplication;
import org.springframework.boot.autoconfigure.SpringBootApplication;
@SpringBootApplication
public class Main {
public static void main(String[] args) {
SpringApplication.run(Main.class, args);
}
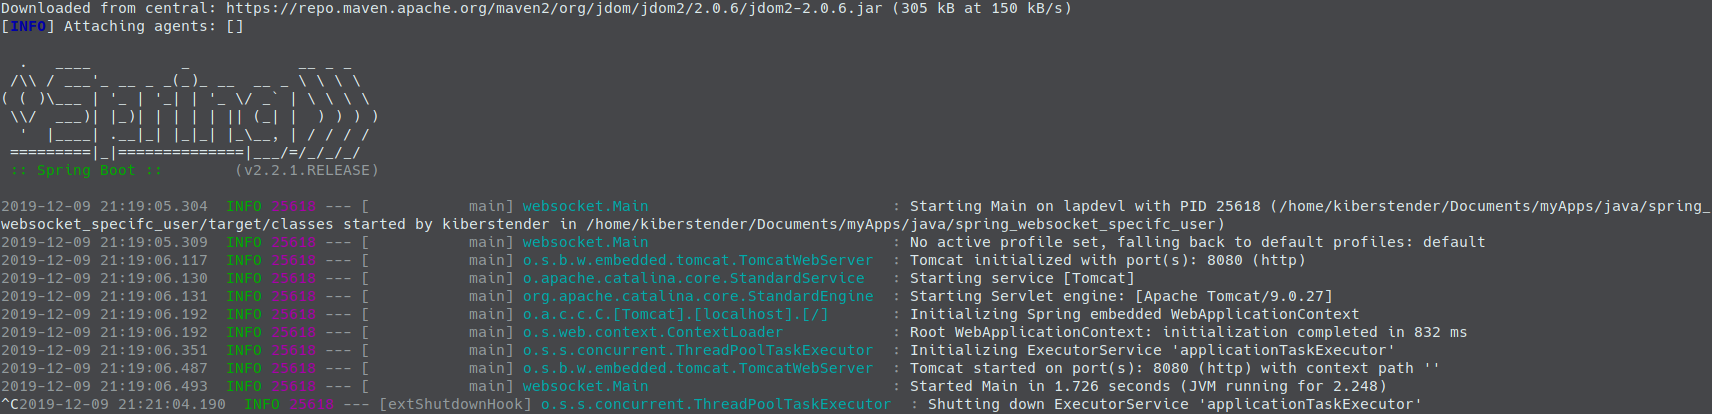
}Now you can run it to test if everything works
mvn spring-boot:runor
gradle bootRunIf everything went fine you will see something similar to this:
Let's create our WebSocket
Navigate back to /src/main/java and create the packages org.websocket.spring.config and org.websocket.spring.controller

PS: Before we proceed, be sure that everything you've done so far is correct and you have a working Spring application. You can tell if you have it by looking at the picture above. Don't try the rest of the steps if it is not running at this point. Otherwise it will be hard for you to know what is wrong and it will be worse as more you progress.
Now let's keep going ...
Create a new file named WebSocketConfig.java in /src/main/java/org/websocket/spring/config and add the following
package org.websocket.spring.config;

import org.springframework.context.annotation.Configuration;
import org.springframework.messaging.simp.config.MessageBrokerRegistry;
import org.springframework.web.socket.config.annotation.EnableWebSocketMessageBroker;
import org.springframework.web.socket.config.annotation.StompEndpointRegistry;
import org.springframework.web.socket.config.annotation.WebSocketMessageBrokerConfigurer;

@Configuration
@EnableWebSocketMessageBroker
public class WebSocketConfig implements WebSocketMessageBrokerConfigurer {

  @Override
  public void configureMessageBroker(MessageBrokerRegistry config) {
    config.enableSimpleBroker("/user", "/topic", "/queue");
    config.setApplicationDestinationPrefixes("/app");
  }

  @Override
  public void registerStompEndpoints(StompEndpointRegistry registry) {
    registry.addEndpoint("/websocket-chat").withSockJS();
  }
}
Spring built-in support
STOMP is just a protocol to make it easier for us sending messages to the server. Before STOMP we had to create data classes full of enums to know which request type it was, perform correct processing flow and return appropriate response because we had only one endpoint in the WebSocket. With STOMP we can create 'internal urls' for actions very similar to Queue applications(Rabbit MQ, Zero MQ, etc), with the difference that when no client is listening to RabitMQ and some data i sent to the Queue, RabbitMQ stores it until someone connects and consumes it, while with STOMP, if nobody is listening to the url and some data is sent, nobody will ever consume that data. So based in the url you can bind a function (like you do with Rest Urls). For this purpose Spring has something nice for us, it pre-defines 3 types of URL: /topic, /queue and /user.
- /topic- By creating any endpoint that starts with this root (like /topic/newMember or /topic/disconnectedMember) Spring will send the messages to any connected user in the WebSocket
- /queue- By creating any endpoint that starts with this root (like /queue/register or /queue/unregister) Spring will send the messages only to the user who requested it, like a normal HTTP url. Imagine you want to register to our chat and if you are eligible you want to receive the list of the other connected users but the other users already have this list, so you don't want to send them anything.
- /user- By creating any endpoint that starts with this root (like /user/{username}/msg) Spring will send the messages only to the user in the brackets(
{username}). Notice that when we implement the /user routes we won't need user{username}, it was just to ilustrate my example.
Configuration file explanation
We created a Spring Configuration class with the annotation @Configuration to configure the base of our WebSockets endpoints. For enableSimpleBroker we set the three 'Spring built-in helpers': /user, /queue, /topic because we will need all of them. /user to redirect specific user chat messages, /queue to register and unregister our user and /topic to spread the word that a new user has entered or left the room.
The /app in setApplicationDestinationPrefixes method call is a random name you can give to segregate your WebSocket routes from normal Http routes. Last but not least: addEndpoint call creates our WebSocket in the url we pass as a parameter to connect to our WebSocket in our example you have to use the following string: ws://localhost:9000/websocket-chat(only if you are using an outside WebSocket client app, because in our Javascript internal client we only need to use /websocket-chat).
Now let's create the data class where we will store the message, who send and who should receive it. Just create a class named WebSocketMessage and add the following(I created this class in the package /src/main/java/org/websocket/spring/controller):
package org.websocket.spring.controller;

public class WebSocketMessage {
  public final String toWhom;
  public final String fromWho;
  public final String message;

  public WebSocketMessage(final String toWhom, final String fromWho, final String message){
    this.toWhom  = toWhom;
    this.fromWho = fromWho;
    this.message = message;
  }
}
No much explanation is needed(I guess), in a Real World situation of course you would create the basic hashCode, equals and toString, maybe even getters and setters, I prefer the immutable approach, but this is just an example so let's not bother with so much details. So let's create our Spring Controller. Just go to /src/main/java/org/websocket/spring/controller again and create WebSocketController.java file and add the following:
package org.websocket.spring.controller;

import java.util.Set;
import java.util.HashSet;
import org.springframework.messaging.handler.annotation.MessageMapping;
import org.springframework.messaging.handler.annotation.SendTo;
import org.springframework.messaging.simp.annotation.SendToUser;
import org.springframework.messaging.simp.SimpMessagingTemplate;
import org.springframework.stereotype.Controller;

@Controller
public class WebSocketController {
  private final SimpMessagingTemplate simpMessagingTemplate;   //1
  private final Set<String> connectedUsers;     //2

  public WebSocketController(SimpMessagingTemplate simpMessagingTemplate){
    this.simpMessagingTemplate = simpMessagingTemplate; //1
    connectedUsers = new HashSet<>();  //2
  }

  @MessageMapping("/register")  //3
  @SendToUser("/queue/newMember")
  public Set<String> registerUser(String webChatUsername){
    if(!connectedUsers.contains(webChatUsername)) {
      connectedUsers.add(webChatUsername);
      simpMessagingTemplate.convertAndSend("/topic/newMember", webChatUsername); //4
      return connectedUsers;
    } else {
      return new HashSet<>();
    }
  }

  @MessageMapping("/unregister")  //5
  @SendTo("/topic/disconnectedUser")
  public String unregisterUser(String webChatUsername){
    connectedUsers.remove(webChatUsername);
    return webChatUsername;
  }

  @MessageMapping("/message")  //6
  public void greeting(WebSocketMessage message){
    simpMessagingTemplate.convertAndSendToUser(message.toWhom, "/msg", message);
  }
}
I put comments listing the interesting points here:
- Starting from version 4 (I'm not sure) Spring does not need
@Autowiredto inject objects anymore if you want to initialize them in the constructor. It makes it perfect for creating immutable components or at least decrease variables mutability, so what I did was inject an object of the typeSimpMessagingTemplate. This object is what will hellp us to redirect our messages to the correct user. - In order to show to the other users who is currently connected so you don't need to guess the user name you want to send a message, I created the Set object that will hold the name of the connected users.
- I created this route to register our user when he connects to our WebSocket. You'll see in the javascript part that this is not automatic, you have to send a message to the url
/app/registerright after you are connected. The@SendToUser("/queue/newMember")create the endpoint our user will subscribe to (or listen in other words) so when he/she register to our WebSocket the answer/response (whatever the function returns, in this case the Set of connected users) will be sent only to him/her, because if you notice, it is a/queueendpoint. - I just check if the user already exists in our 'Database' and if so I return an empty Set(you will understand why in the JS part). Otherwise I call
simpMessagingTemplate.convertAndSend("/topic/newMember", webChatUsername);to warn the other users that someone just entered the room and then return the list of all users to new connected user. Notice that we are just sending a message to a/topicendpoint, so everybody will receive it. - Here it's the opposite of our previous function. One user decided to disconnect, so we remove him/her from our 'Database' and then return his/her name to a
/topicendpoint to the rest of the users know he/she left. See that here instead of using thesimpobject I used Spring annotationSendTo, it has the same effect as the functionconvertAndSendin theSimpMessagingTemplateclass. The difference is we can have compiler advantage, because we say what we want to send to the endpoint in the function signature, while in theconvertAndSendthe parameter is an Object. I used the different approach in the previous function because one cannot send data to two endpoints in one function using the return mechanism, so I returned to the/queueusing the language syntax return and usedconvertAndSendto the/topicendpoint. - And here is where the magic happens. Here we receive a message from the user and using our class
WebSocketMessageand extract to whom this message should be sent. In theory the annotation@SendToUsercould do the trick to us and redirect the message to the right recipient but to achieve this I learned in all my researches that you have to configure Spring Security, so the framework will log in the user and create a Principal instance for each connected user and using this Principal object it would know to which user redirect the message. I might be wrong but all the time I tried without Spring Security it did not work. So what that brazilian post I mentioned in the begining said was to ignore this annotation and use the methodconvertAndSendToUserfrom the classSimpMessagingTemplateand as you will see if you follow the whole tutorial, it works.
Now we have to tell Spring that these classes are Spring components and thus Spring should instantiate them for us, so we will modify our Main class a bit and add Spring component scanner and tell the packages that Spring should scan and do it's magic. So add @ComponentScan({"org.websocket.spring"}) in our Main class:
...
import org.springframework.context.annotation.ComponentScan;

@SpringBootApplication
@ComponentScan({"org.websocket.spring"})
public class Main {
...
Done, now Spring will initiate our @Controller class automatically making our WebSocket backend complete. Very simple right? Well we could finish it here, but I'll make a simple frontend to make it more complete.
Frontend
For frontend I will be even simpler than I was in the backend. I won't use any kind of framework(React.js, Angular, jQuery, anything) but two libraries: SockJs-client and stomp-websocket. The rest will be pure vanilla Javascript. SockJs and Stomp-Websocket gives us am eaiser way to control our WebSocket client and the latter adds STOMP, so we don't have to manually do anything when connected to our WebSocket server. To add SockJs and Stomp-Websocket I will use Webjars instead of manually download the js files and put them in our resources directory. So just add this two depencies in our build file:
Maven
<dependency>
  <groupId>org.webjars</groupId>
  <artifactId>webjars-locator-core</artifactId>
</dependency>
<dependency>
  <groupId>org.webjars</groupId>
  <artifactId>sockjs-client</artifactId>
  <version>1.0.2</version>
</dependency>
<dependency>
  <groupId>org.webjars</groupId>
  <artifactId>stomp-websocket</artifactId>
  <version>2.3.3</version>
</dependency>
Gradle
compile("org.webjars:webjars-locator-core")
compile("org.webjars:sockjs-client:1.0.2")
compile("org.webjars:stomp-websocket:2.3.3")
If you have never used nor heard about Webjar it is just javascript libraries packaged in a Java jar package, so you can manage them as normal dependecies via maven, gradle or whatever. Whenever you add these libraries you still have to add them in your HTML file old style:
....
<script src="/webjar/sockjs-client/1.0.2/sock.min.js"/>
....
As it is annoying to everytime we change the library version we have to go to our HTML files and change the src to reflect the new version I added locator-core Webjar, it helps us removing the verbose to add the version so if you update it, you will not have to change your HTML file:
....
<script src="/webjar/sockjs-client/sock.min.js"/>
....
Webjar does not work only with Javascript but with CSS as well. I am going to use Bootstrap CSS not make it beautiful but to make everything aligned and understandable. So add another dependency in your Build file:
Maven
<dependency>
  <groupId>org.webjars</groupId>
  <artifactId>bootstrap</artifactId>
  <version>3.3.7</version>
</dependency>
Gradle
compile("org.webjars:bootstrap:3.3.7")I will create only the basics for sending and receiving messages and I won't explain any Javascript language syntax detail or HTML. The only explanation you will have in this section is which objects you have to instantiate, which methods to use and why are we using these so you can do your own modifications easily to adequate to your reality. So let's create our index.html file inside /src/main/resources/static directory and add the following:
<html>
  <head>
    <meta name="viewport" content="width=device-width, initial-scale=1">
    <title>Webchat WebSocket</title>
    <link href="/webjars/bootstrap/css/bootstrap.min.css" rel="stylesheet">
  </head>
  <body>

    <div id="main-content" class="container">
      <div class="row text-center">
        <h2>WebChat WebSocket</h2>
      </div>

      <br/>

      <div class="row text-center">
        <div class="col-md-4">
          <label for="webchat_username">Username:</label>
          <input type="text" id="webchat_username" placeholder="Put your username here..."/>
        </div>
        <div class="col-md-1">
          <input type="button" class="btn" id="webchat_connect" value="Connect"/>
        </div>
        <div class="col-md-1">
          <input type="button" class="btn" id="webchat_disconnect" value="Disconnect" disabled="true"/>
        </div>
      </div>

      <div class="row">
        <div class="row text-center"><h2>Connected Users List</h2></div>
        <div id="chat_user_list" class="row"></div>
      </div>

      <div id="chat_list" class="row"></div>

      <div id="alerts"></div>
    </div>

    <script src="/webjars/sockjs-client/sockjs.min.js"></script>
    <script src="/webjars/stomp-websocket/stomp.min.js"></script>
    <script src="/js/index.js"></script>
  </body>
</html>
Now we are going to create our Javascript index.js file inside /src/main/resources/static/js and add the following:
(function(){
  function select(str){
    return document.querySelector(str);
  }

  function alertMessage(message, type){
    let alerts = select("#alerts");

    let el = document.createElement("p")
    el.innerHTML = message
    el.classList.add(type)
    alerts.append(el)
    setTimeout(() => alerts.innerHTML = '', 5000)
  }

  function drawChat(chatUsername){
    return `<div class="row text-center">\n  <h3>Chat with ${chatUsername}</h3>\n</div>\n<div id="chat_messages_${chatUsername}" class="row"></div>\n<br/>\n<div class="row">\n  <div class="col-md-4"><textarea id="chat_input_${chatUsername}"></textarea></div>\n  <div class="col-md-1"><input type="button" id="chat_send_to_${chatUsername}" value="Send"/></div>\n</div>`
  }

  function getChat(chatList, chatName){
    let chatRoom = chatList.querySelector(`#chat_${chatName}`)
    if(chatRoom === null){
      let el = document.createElement("div")
      el.id = `chat_${chatName}`
      el.innerHTML = drawChat(chatName)
      el.classList.add('row')
      chatList.append(el)
      return el;
    } else {
      return chatRoom
    }
  }

  function clickSendButton(chatRoom, toWhom, stompClient, username) {
    chatRoom.querySelector(`#chat_send_to_${toWhom}`).addEventListener('click', () => {
      let msgInput = chatRoom.querySelector(`#chat_input_${toWhom}`)
      let msg = msgInput.value;

      if (msg && msg !== '') {
        stompClientSendMessage(stompClient, '/app/message', JSON.stringify({
          toWhom: toWhom,
          fromWho: username,
          message: msg
        }))
        let messages = chatRoom.querySelector(`#chat_messages_${toWhom}`);
        messages.innerHTML += `<div class="row"><div class="col-md-1">Me:</div><div class="col-md-8">${msg}</div></div>`
        msgInput.value = ''
      } else {
        alertMessage(`Message to user [${toWhom}] cannot be empty !!!`, "bg-danger")
      }
    }, true)
  }

  function displayMessage(chatList, stompClient, username, {fromWho, message}){
    let chatRoom = getChat(chatList, fromWho);
    let messages = chatRoom.querySelector(`#chat_messages_${fromWho}`);
    messages.innerHTML += `<div class="row"><div class="col-md-1">${fromWho}:</div><div class="col-md-8">${message}</div></div>`

    clickSendButton(chatRoom, fromWho, stompClient, username)

  }

  function displayUserList(userList, chatList, username, stompClient){
    const lis = userList.length === 0 ? "It looks like you are the only one in the chat room !!!" : userList
        .reduce((acc, item) => `${acc}<li id="user_${item}"><a href="#chat_${item}">${item}</a></a></li>`, "")

    select("#chat_user_list").innerHTML = `<ul>${lis}</ul>`

    userList.forEach(item => select(`#chat_user_list #user_${item}`).addEventListener('click', () => {
      clickSendButton(getChat(chatList, item), item, stompClient, username);
    }, true))
  }

  function stompSubscribe(stompClient, endpoint, callback){ //8
    stompClient.subscribe(endpoint, callback)
    return stompClient
  }

  function stompClientSendMessage(stompClient, endpoint, message){ // 9
    stompClient.send(endpoint, {}, message)
    return stompClient
  }

  function disconnect(stompClient, username, connectBtn, disconnectBtn, clicked = false){
    connectBtn.disabled = false
    disconnectBtn.disabled = true
    if(clicked){
      stompClientSendMessage(stompClient, '/app/unregister', username)
    }
    stompClient.disconnect() //6-1
  }

  function connect(username){ //1-1
    return new Promise((resolve, reject) => {
      let stompClient = Stomp.over(new SockJS('/websocket-chat'))
      stompClient.connect({}, (frame) => resolve(stompClient))
    })
  }

  //To guarantee that our page is completely loaded before we execute anything
  window.addEventListener('load', function(event){
    let chatUsersList = [];
    let chatList = select("#chat_list");
    let connectButton = select("#webchat_connect");
    let disconnectButton = select("#webchat_disconnect");

    connectButton.addEventListener('click', () => {
      let username = select("#webchat_username").value;

      if(username == null || username === ''){
        alertMessage('Name cannot be empty!!!', 'bg-danger')
      } else {
        connect(username) //1
            .then((stompClient) => stompSubscribe(stompClient, '/user/queue/newMember', (data) => { //2
              chatUsersList = JSON.parse(data.body)
              if(chatUsersList.length > 0){
                displayUserList(chatUsersList.filter(x => x != username), chatList, username, stompClient)
              } else {
                alertMessage("Username already exists!!!", "bg-danger")
                disconnect(stompClient, username, connectButton, disconnectButton)
              }
            })).then((stompClient) => stompSubscribe(stompClient, '/topic/newMember', (data) => {  // 3
              chatUsersList.push(data.body);
              displayUserList(chatUsersList.filter(x => x != username), chatList, username, stompClient)
            })).then((stompClient) => stompClientSendMessage(stompClient, '/app/register', username)) // 4
            .then((stompClient) => stompSubscribe(stompClient, `/user/${username}/msg`, (data) => {
              displayMessage(chatList, stompClient, username, JSON.parse(data.body))
            }))
            .then((stompClient) => { //5
              connectButton.disabled = true;
              disconnectButton.disabled = false;
              disconnectButton.addEventListener('click', () => disconnect(stompClient, username, connectButton, disconnectButton, true), true); // 6
              return stompClient;
            }).then((stompClient) => stompSubscribe(stompClient, '/topic/disconnectedUser', (data) => { // 7
              const userWhoLeft = data.body;
              chatUsersList = chatUsersList.filter(x => x != userWhoLeft);
              displayUserList(chatUsersList.filter(x => x != username), chatList, username, stompClient);
              alertMessage(`User [${userWhoLeft}] left the chat room!!!`, "bg-success")
            }))
      }
      }, true)
  });
})();
As I previously said, I won't explain JS details here, I will only focus in the WebSocket stuff, but if you don't know what starts everything you won't understand a thing here, so the entry point of everything is window.addEventListener('load', function(event). Everything above it is just function declaration. So now I will do the samne as before and put comments showing the important things using numbers:
- First things first. After checking the username to see if it's valid or not we connect to our WebSocket, if you look at the function
connectyou'll see that it's very simple. Just give the url to our WebSocket server, the one we configured in the WebSocketConfig java class:/websocket-chat. - Now we wil start to subscribe to endpoints enabling us to receive messages. The first endpoint we will subscribe is the newMember one to find out if we were
registeredor not. Remember I said it's not automatic and we should send a message to register? So, before sending this message we have to subscribe to the 'return' endpoint otherwise the message will be sent in a moment we are not listening to it. Another point here, if you look at the Java function I return an empty list if the username already exists. This is just me saying: 'Your username already exists, try another one'. You can do this differently, you can create a class representing failure or success for example, but what you cannot do is return 'null'. I tried, it does not work, the server never sends the message. - In order to keep receiving alerts when other users connect we subscribe to the
/topicversion of the above endpoint. If you remember, the/queue/newMemberwill return us a list with all connected users, and the/topicone only the name of whoever connected. Another difference is that because we use/queuewe will only receive once the whole list of users, so to keep up to date we need the/topicone. You might notice that I do not check when we connect to ignore our name, so feel free to fix this bug ^^ - Now that we subscribed to the endpoint that will tell us if we were registered to the chat room or not, we can finally register. So I sent a message to
/app/registerand actually register - Here I'm disabling the connect button so you don`t accidentally reconnect and enabling the disconnect one.
- Here I'm attaching a function to disconnect us when we click in the disconnect button.
- Here is a simple reaction to when someone leave the chat.
- Here you can see how simple it is to subscribe to a endpoint, you only need to call
subscribemethod in the StompClient and pass the endpoint you want to subscribe and the callback to react to it's messages. - The same goes to how simple it is to send a message to any endpoint. Just call the method
sendin the StompClient and pass the endpoint and the message itself. Check if the message needs to be converted before sending, like JSON.stringify or whatever.
The rest is just me trying to make it easier for you to adapt it to whatever you need. Run it and feel free to curse or cumpliment me when I add comments to this blog ^^ if you want to check the source code please refer to this URL
Best regards, thanks for your time, I hope I helped you in anyway. Bye