Introduction
The previous post (Webpack- A complete introduction) has introduced the basics of Webpack, but it constrained all that was done to be a CLI(Command Line Interface) application, while Webpack is more focused on frontend applications. So, in this post I will show you what is necessary to instead of print in the console, render the data into an HTML page.
I will continue the development of the Javascript project I was working with on the previous post, so, if you did not read it, please consider doing it before starting this post or if you prefer, you can clone the project and checkout the post's branch:
git clone https://bitbucket.org/kiberStender/node_app.git
cd node_app/
git checkout --track origin/webpack_introduction
I won't be explaining what is already explained in the other post and I will assume you are already familiarized with Javascript, NodeJS and the basic of Webpack.
HTML-Loader and HTMLWebpackPlugin
Well, all that was done in the previous post is cool and nice but, the idea of this tutorial is to create a frontend and not a CLI app. In order to do that, we have to deal with HTML files. But... what is it there to deal with? HTML is a so simple "language*", why would you need to handle it? For now we only have one Javascript file(main.js), but as the application grows, the best practices ask us to split it in as many files as we can/need and because Javascript is an interpreted language, if you forget to include some file (<script src=".../path">), you won't notice it until it is too late. So we have an automated way to add automatically all Javascript and CSS files, to never forget them. To achieve this, we have the HtmlWebpackPlugin. To configure this plugin, we first add it via npm install ...:
npm install --save-dev html-webpack-plugin@4.2.0
PS: In order to make it work even years after this post is written, use the same version of the libraries I'm using.
Now you have to add /webpack.config.js "import" HTMLWebpackPlugin before module.exports = {...:
...
const HtmlWebpackPlugin = require("html-webpack-plugin");

module.exports = {
...
PS: Whenever you see three dots ... it means: "keep whatever comes before this". Or if it comes after what we are adding/modifying, it means: "keep whatever comes after these dots"
Now configure it in plugins property and tell which HTML file you want to operate:
...
plugins: [
  ...
  new HtmlWebpackPlugin({template: "./src/index.html"}),
  ...
]
...
PS: You can specify more than one HTML file but remember that Webpack is more indicated for SPA(Single Page Application)
If you run it, you'll notice that you have 2(two) problems:
- There is no HTML file yet
- Webpack will complain that it needs a loader for HTML files
So first let's fix the missing HTML file. Create the HTML file named index.html inside /src. Now add the contents:
<!doctype html>
<html>
  <head>
    <title>Getting Started</title>
  </head>
  <body>
    <div id="root"><div>
  </body>
</html>
Now we add a loader for HTML files. Simply install html-loader:
npm install --save-dev html-loader@1.1.0
You could run now, but it would still not work, because we haven't configured html-loader, so let's do it:
...
rules: [
  ...
  {
    test: /\.(html|htm)$/,
    use: {
      loader: "html-loader"
    }
  },
  ...
]
...
If you run now, this is what you are supposed to see:
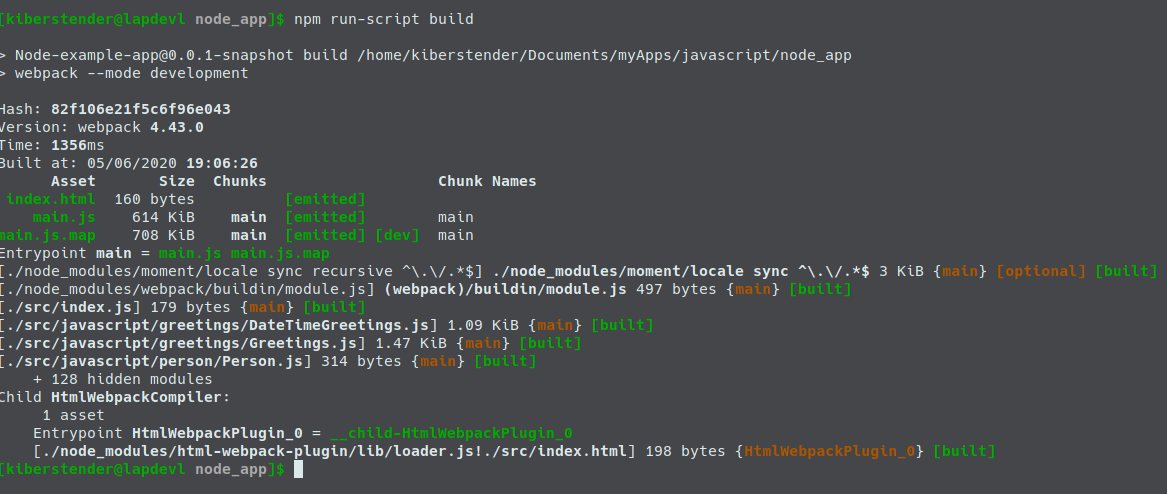
If you pay attention to our HTML file, there is no <script> tag there, but if you open /dist/index.html file you can see that there is a <script type="text/javascript" src="main.js"></script> including main.js. The loader is not there only to help the plugin to work, it can tweak the HTML removing all blank spaces and the comments, making it lighter to transfer. Simply add the following values in options property :
...
{
  test: /\.(html|htm)$/,
  use: {
    loader: 'html-loader',
    options: {
      // Disables tags and attributes processing
      minimize: true
    }
  }
}
...
Hot-Reload or Live-Reload
Webpack is made to help you create static frontend pages. That means, no server(JSF, PHP, etc) will pre process your HTML pages before sending to the user. Every processing to change data in the screen is made by your javascript and css files locally on the user browser, thus decreasing backend number of requisitions. But to test your application in your browser, you have to every time you change something, go to your browser and manually CTRL + F5. If you have two monitor and keep your code open in one and the browser in the other, it is very annoying to change the monitor every time to refresh your page and check if what you did is correct. Hot-Reload or Live-Reload is a feature that helps you detecting all changes you do in your code and automatically reload your running application. First install webpack-dev-server:
npm install --save-dev webpack-dev-server@3.10.3
It is a simple server to run your application in Hot/Live-reload mode, so whenever you save a file, Webpack will detect if there is any difference and if so, recompile only that file so you don't have to stop the whole application for one diff. PS: Hot/Live-Reload is just for development purpouses, DO NOT USE IT IN PRODUCTION. It is slow and it does not uglify your code making it easier for non-authorized people to read or debug it.
Let's create our hot-reload command. Open /package.json and in the scripts property and add these lines:
...
"scripts": {
  ...
  "live": "webpack-dev-server --mode development",
  "live:prod": "webpack-dev-server --mode production",
  ...
}
...
And that's it, no configuration is needed. Run it and you will see this:
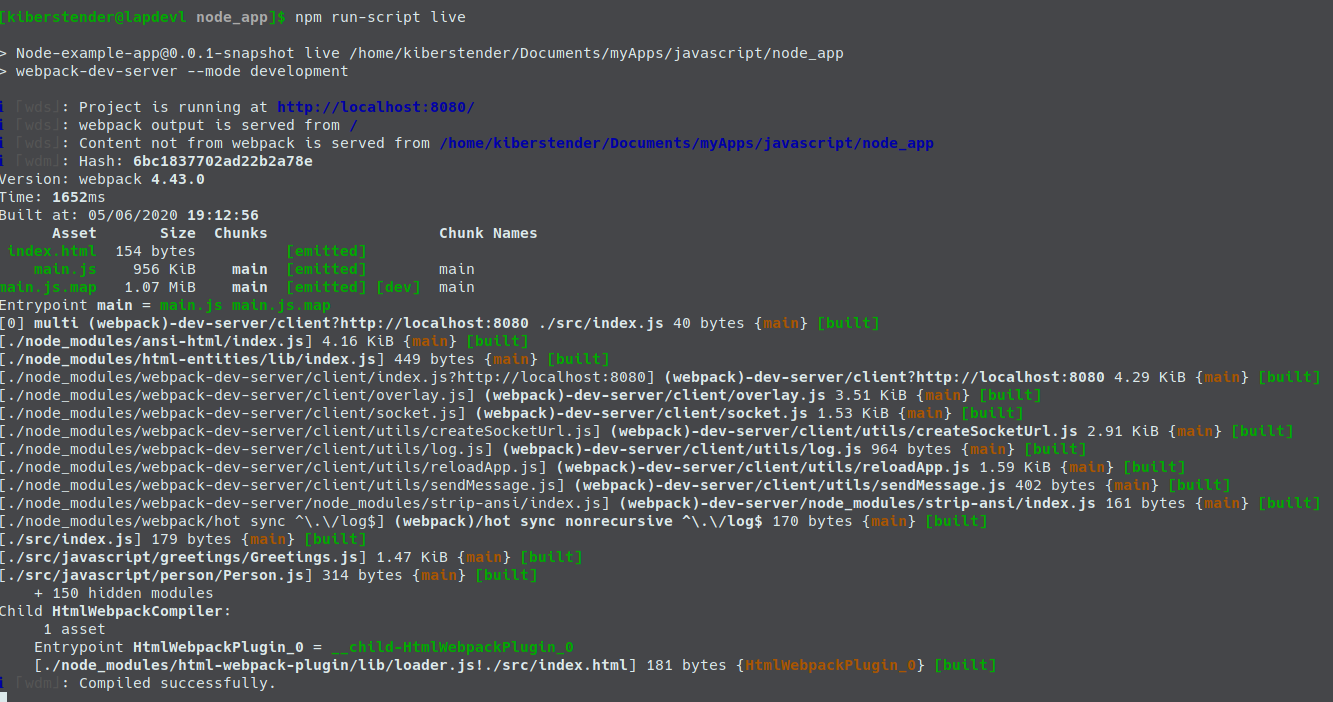
Go to http://localhost:8080 and see your page opened with a simple Title: Getting started and the rest of the page white. Let's put some action in it. Change /src/index.js file content to:
import Person from "person/Person";
import Greetings from "greetings/Greetings";

function buildGreetElement(){
  const greetElement = document.createElement("div");
  const person = new Person("Node", "Dev");
  let greetings = new Greetings(person);
  greetElement.innerHTML = greetings.greet();

  return greetElement;
}

function component() {
  const mainDiv = document.createElement("div");

  mainDiv.appendChild(buildGreetElement());

  return mainDiv;
}

document.querySelector("#root").appendChild(component());
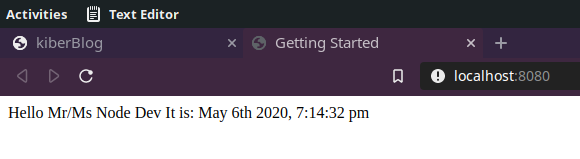
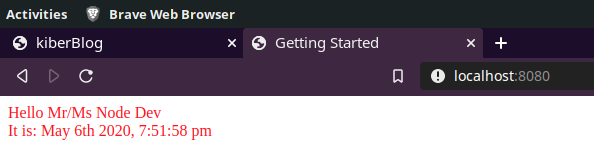
Without stoping the application, check your terminal after you save /src/index.js and you will see Webpack recompiling/transpiling your changed files (in this case /src/index.js only), now go to your browser and without pressing anything the white page will show you the below picture:
You can see that \n does not "jump" a line here right? So let's make it more frontend. First open /src/javascript/greetings/DateTimeGreetings,js and make it return an HTML element, so change the function greetDateTime to:
...
greetDateTime(dateFormat){
  const mainDiv = document.createElement("div");
  mainDiv.setAttribute("id", "date-time-greetings-component");
  mainDiv.append(`It is: ${moment().format(dateFormat)}`);

  return mainDiv;
}
...
Now open your /src/javascript/greetings/Greetings,js and do the same with the function greet:
...
greet(){
const mainDiv = document.createElement("div"); //The main div that will hold everything
mainDiv.setAttribute("id", "greetings-component");
const {name, surname} = this.person;
mainDiv.append(`Hello Mr/Ms ${name} ${surname}`); // Adding the greet to be displayed
// greetDateTime already returns an HTML element
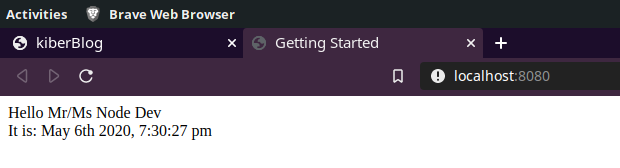
mainDiv.appendChild(this.dateTimeGreeter.greetDateTime("MMMM Do YYYY, h:mm:ss a"));
return mainDiv;
}
...
Now open /src/index.js and change it one last time:
import Person from "person/Person";
import Greetings from "greetings/Greetings";

function component() {
  const mainDiv = document.createElement("div");
  mainDiv.setAttribute("id", "greetings-example");
  const person = new Person("Node", "Dev");
  let greetings = new Greetings(person);

  mainDiv.appendChild(greetings.greet());

  return mainDiv;
}

document.querySelector("#root").appendChild(component());
Now it should be like that:
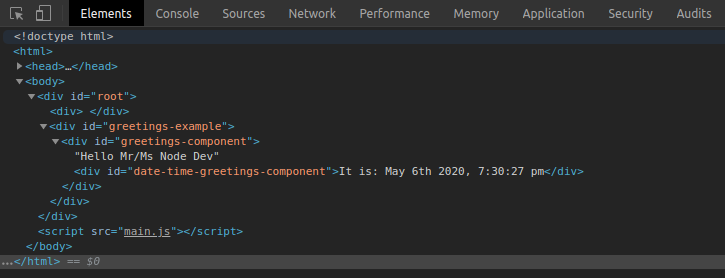
And the HTML source:
Hashing your files
Once the application officially became a Frontend app, it might have an annoying problem that has started to be dealt with when adding clean-webpack-plugin. But, back then, cache was a problem at development level and as I mentioned, it is awesome to have a cache at production level, because it speeds up the app. Modern Browsers when they detect by file name that it was already downloaded, they do not need to download it again in case the page is refreshed, thus decrease the amount of bandwith required to load the page and make it faster to render.
This is beautiful once your page is done and in production, but when you are developing, it can create old annoying caches that does not refresh. To prevent that you can use hashing names in your files provided by Webpack for free. Webpack will hash your whole files at build level and generate a hash string, so everytime you recompile the file, if there is a difference, this hash value will be different and browsers will never cache something that changed the name. To do so, it is very easy, just append [hash] to whatever part of your output file name you want inside /webpack.config.js:
...
output: {
  filename: "main.[hash].js",
  path: ...
},
...
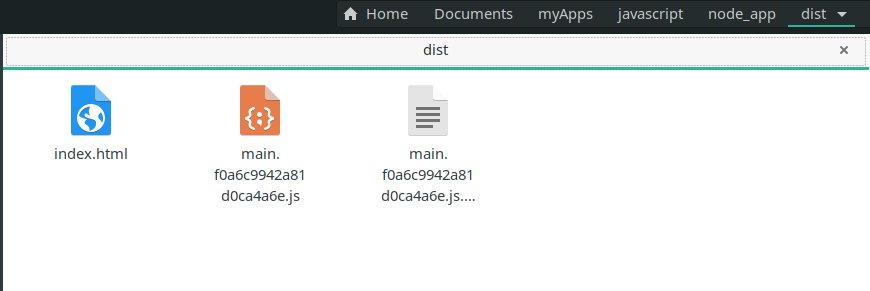
Now putting everything together: The clean plugin will always delete the content of /dist directory, hashing will always create new name for your files as you do changes on them, then HTML loader will always include them in your page to you, so you never forget any javascript file. Now you can only focus on coding your app without being affraid of having old stuff in your cache or issues because some new file was not added to you page. This is what you will see after npm run-script build or npm run-script build:prod:
What about CSS?
As Javascript has many transpilers (Typescript, Coffescript, Javascript itself in different versions) in CSS there are 2(two) main transpilers(called Pre processors): LESS and SASS. In this tutorial I will use SASS, because I'm going to use Boostrap and it is built using SASS, then by using both together, you can use Bootstrap pre-defined functions and other things specific to SASS. If you, for some reason, don't want to use SASS, but still want to use Bootstrap, don't worry, it is still possible, but you will have to compile Bootstrap to CSS and then call it in your LESS or pure CSS files without any problem. So let's start configuring SASS installing all the dependencies:
npm install --save-dev sass@1.26.5 sass-loader@8.0.2 style-loader@1.2.0 css-loader@3.5.3
Now we go to our /webpack.config.js file and add a new rule in our module property, like it was done for Babel and HTML-loader:
...
{
  test: /\.s[ac]ss|css$/i,
  use: ["style-loader", "css-loader", "sass-loader"]
}
...
Now create a styles directory inside /src to store the SASS files and add it to our path resolution in the Webpack config file:
...
resolve: {
  modules: [path.resolve(__dirname, "src/javascript"), path.resolve(__dirname, "src/styles"), "node_modules"]
}
...
Now do the same in /jest.config.js:
module.exports = {
  "moduleDirectories":["src/javascript", "src/styles", "node_modules"]
}
PS: As node_modules can be a huge directory to look for, I like to leave it at the end of the array of modules, so Webpack/Jest will always look into our modules before anything else, but, I have to say here that I'm not 100% sure it obeys the order you declare things.
And that is all you need to do to have SASS in the project. A small mention here, to the test property, where the value is this: s[ac]ss. This is due to SASS having 2(two) main file formats: .sass and .scss. Both means the same, if you want to understand more about it read it here. One day I might do a tutorial focused in SASS and explain these differences in the file formats. Now to test if everything worked you can create a file index.scss in your /src/styles directory and put the following:
$a_color: red; //A variable

#greetings-example {
  color: $a_color; //Using the variable
}
Go to /src/index.js file and import /src/styles/index.scss:
...
import Greetings from "greetings/Greetings";
import "index.scss";
...
Yes, for CSS, SASS or LESS files, when importing them, there is no need for adding "from" keyword. Keep the rest as it was. Now if you haven't stopped the application, restart it or run it otherwise(npm run-script live). If your text now is red, congratulations, you succeded in adding SASS pre proprocessor in your app:
Bootstrap
Bootstrap is one of the most famous CSS libraries used nowadays. It is very simple to use and have a big community for you to ask your questions. I could use any library here, but I decided to put this one for it is very known and easy to add. To have Bootstrap simply install the dependencies:
npm install bootstrap@4.4.1 jquery@3.5.0
jQuery is here because Bootstrap needs this library to work, I will not use jQuery for anything in this tutorial. Now to test if this worked, add the following changes to /src/styles/index.scss file:
@import '~bootstrap';

#greetings-example {
  @extend .container;
  @extend .text-primary;
}
Look again at your page(if you haven't stopped your application, otherwise run it again) and if the color is now blue, you did it, you have a fully working frontend application made with Webpack, Babel, SASS and Bootstrap.

Different CSS rules for each class
A simple CSS good pratices rule here. The reason I put an ID in each mainDiv inside each class of the project, is to separate scope when using CSS. So using Webpack will allow you to create a different file for each "component" in the project making it easier to create a CSS(or in this case SASS) file dedicated for each class so we to not mix the concerns. To show that, I will create a new file named /src/javascript/App.js that will be the entry point of the application leaving /src/index.js to just start the application and nothing more, like a main method in Java/C/C++.
import Person from "person/Person";
import Greetings from "greetings/Greetings";

import "app.scss";

export default class App {
  buildTitle(){
    const h2Element = document.createElement("h1");
    h2Element.append("Greetings Example");

    return h2Element;
  }

  buildGreetings(){
    const person = new Person("Node", "Dev");
    return new Greetings(person);
  }

  build(){
    const mainDiv = document.createElement("div");
    mainDiv.setAttribute("id", "greetings-example");

    mainDiv.appendChild(this.buildTitle());
    mainDiv.appendChild(this.buildGreetings().greet());

    return mainDiv;
  }
}
Notice that I imported app.scss and not index.scss. I'm not creating a new file, I will renamed /src/styles/index.scss to /src/styles/app.scss and keep the rest:
mv src/styles/index.scss src/styles/app.scss
Then edit /src/index.js:
import App from "App.js"

document.querySelector("#root").appendChild(new App().build());
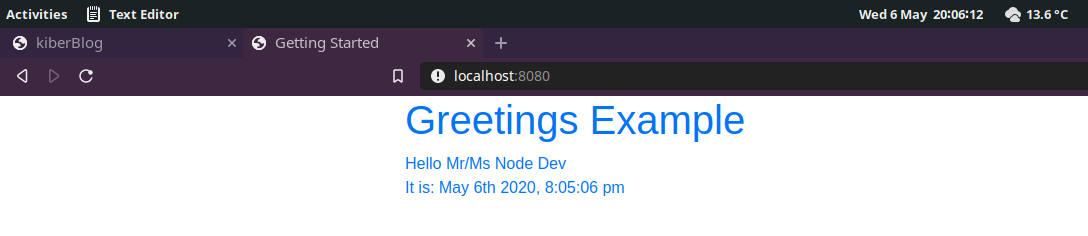
And this is how it should be now:
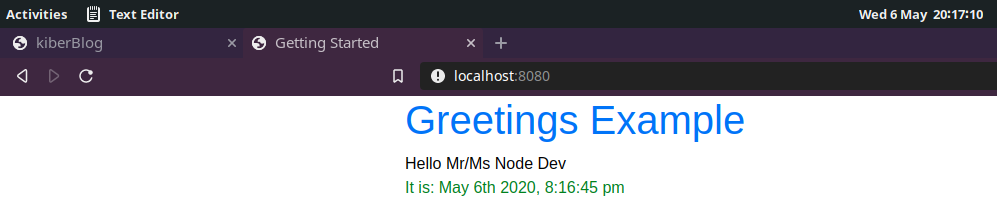
Now create a directory named greetings inside /src/styles/ and create a file inside it(/src/styles/greetings/) named dateTimeGreetings.scss and add the following content:
#date-time-greetings-component {
  color: green;
}
Now import it into file /src/javascrit/greetings/DateTimeGreetings.js:
import moment from "moment";

import "greetings/dateTimeGreetings.scss";
...
...
PS: Notice that because /src/styles was added to path resolution it is possible to use the same url style for css/sass imports
Now the page should be like this:
Now create a greetings.scss file inside /src/styles/greetings/ and add:
#greetings-component {
  color: black;
}
Import it into the /src/javascrit/greetings/Greetings.js:
...
import Person from "person/Person";

import "greetings/greetings.scss";
...
...
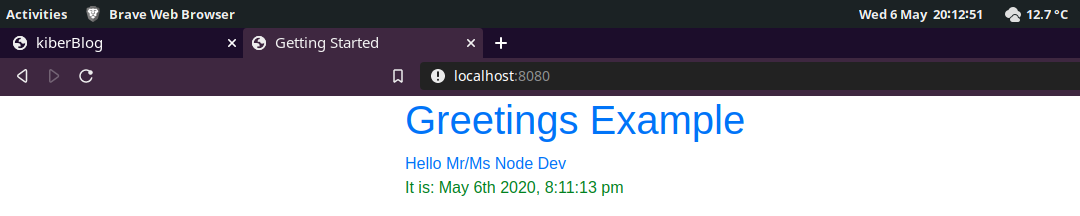
And this is the final result:
Even tough it looks silly, this is to show that, you now can have all your files completely segregated from each other and the result is a clean final code, without coupling and not hard to manage because of the way Webpack helps us.
Serve
When explaining about Hot/Live-reload, I mention that you should never use it in production, because it does not optmize your code making it slow and does not uglify it allowing other people to easily read and debug it or even copy what you did. But I also said that Webpack is for making static frontend, so how one is supposed to run this app in production? Some servers like github static server will simply serve your app without any config, you just copy everything from your /dist and commit. But when you don't have such server and you have to make your own, how do you do it? There is a CLI app named serve that does that for you. To install simply run the command:
npm install --save-dev serve@11.3.0
Then change execute script in /package.json to:
...
"scripts":{
  ...
  "serve":"serve -s dist",
  "execute":"npm run-script build:prod && npm run-script serve",
  ...
}
...
In case you want to serve, but choose if you will build in dev or mode prod I created a simple serve command and I edited execute to be your deploy command so it will always build in prod mod and then serve it. "dist" in the serve -s dist is the name of the directory you want to serve, so if you configured your Webpack to output your files to another place, please change it accordingly. And to run simply execute:
npm run-script execute
And now check http://localhost:5000. Unlike Hot-Reload, every change you do is completely ignored, because it is statically serving what is in your /dist. But of course if you trigger build from another terminal, as serve blocks the actual terminal you are using, and then hit F5 or CTRL + F5 or even the refresh button your changes will be displayed, but this, of course, kills the whole idea of statically serving the application as this is your production application deployed.
Size problem
Now that the application is a frontend instead of a CLI, in order to make it succeed, it has to perform well. It means, after the user typed the url in their browser, the application has to load fast. One problem it has right now is it's size: It weighs more than 400 KiB:
Webpack recommends that the maximum size it can have is 244 KiB. This being said what, should be done? First, find out what is the cause of this huge size. In this case, the problem is in MomentJS. It is being loaded as whole in the application while it is being used very little of it. How to fix it? MomentJS provides a plugin named moment-locales-webpack-plugin, which can help removing the locales not needed in the application. Install it:
npm install --save-dev moment-locales-webpack-plugin@1.2.0
Now, configure it in the file /webpack.config.js:
...
const MomentLocalesPlugin = require('moment-locales-webpack-plugin');
...
In the plugin section, still in /webpack.config.js, instantiate the new plugin:
...
plugins:[
   ...,
   new MomentLocalesPlugin(),
   ...
]
...
By default, if one use new MomentLocalesPlugin(), the plugin will understand that only en locale has to be kept, but if you want to add another locale just pass an object to the constructor:
...
new MomentLocalesPlugin({localesToKeep: ['ru']}), //Russian Locale
...
This way the plugin will keep two locales: en and ru. Run build:prod command and see that the application is smaller than 244 KiB:
Separation of environments
When making a more professional application, usually, you have to separate what you use in development and what you use in production, to not have for example faulty data in production or let the application startup be slow in development, because you want to use all optimizations you do in production. For this and other small issues it is needed to separate options for the app configuration.
As I have probably mentioned more than 3(three) times in this series of posts, Webpack has support for it, both automatic and manual control over the environments. As our application is very simple and small I will use two very simple use cases:
dev-tool: In the very beginning I set a property inwebpack.config.jsnameddevtooltosource-map. This is really nice to help your browser to know more about your application as it is loading and interpreting, so it can apply some more optimizations at "bare metal" level. But a source-map, is a very detailedmetadataabout your functions, classes, modules, etc, so the bigger your code base is, the bigger the time to make source-map. Not that it will take 1 hour, but when you are developing something new or fixing a bug, any second extra it takes to the application to start running for you to see if you fixed or not is annoying. So what if you could turn off source-map when in dev mode and leave it to be done only when you are deploying to your production server?html-loader: When I was showing in this post whathtml-loadercan do to decrease the size of the HTML files by removing blank spaces and comments it was very cool, but in dev environment sometimes having these comments and the identation can help reading the code so it would be better if we have this tunning in production only.
To do so there are at least 3(three) possibilites and I will go deeper in only 1, but it is worthy to know all of them:
- Have more than one
webpack.config.file: You can have as many as you want and each one can be for a specific enviroment. To switch them you only have to pass it in package.jsonscriptscommand. For example, there are 2(two) build commands(buildandbuild:prod), what if there were 2(two) Webpack config file like:webpack.dev.config.jsandwebpack.prod.config.js,scriptscould be changed to be like that:
Then in the respectives Webpack config files, it can set a new property named... "build":"webpack --config webpack.dev.config.js", "build:prod":"webpack --config webpack.prod.config.js" ...modeto eitherdevelopmentorenvironment, so whenever the build commands are ran, it will not be displayed the warning about environment fallback. - Croos-env library: When running the app in different Operational Systems, the way the environmental variable is passed in command line can differ and might be a problem. So installing this lib can help you as it will fix any difference to you and you an write only once your package.json
scriptcommands and pass values without incompatibility. Then you can pass an env variable setting your webpack to Prod or Dev and changemodeproperty accordingly and you can use ternary expressions to assign values to the properties insidewebpack.config.file. - Change
webpack.config.filefrom a object literal to a function that returns the object literal: This function has two parameters and the second of them has the mode value set in the package.jsonbuildcommand: The--mode developmentor--mode production. This way we can use ternary expressions to assign values to all properties insidewebpack.config.jsfile.
The easier way to me(not the best) is the third way. Because it does not require creating additional files, nor changing package.json nor adding any libraries. Again, it is the easier, not the best.
Original:
...
module.exports = {
  entry:...,
  output:...,
  devtool:...,
  plugins:...,
  module:...,
  resolve:...
};
What has to be done:
...
module.exports = function(nv, options) {
  const isProd = options.mode === "production";

  return {
    entry:...,
    output:...,
    devtool:...,
    plugins:...,
    module:...,
    resolve:...
  };
}
Now the ternary expression can be used to dynamically assign values according to the environment to whatever desired property, like for example, change devtool:
...
devtool: isProd ? "source-map" : "eval",
...
And in html-loader:
{
  test: /\.(html|htm)$/,
  use: {
    loader: 'html-loader',
    options: {
      minimize: isProd
    }
  }
}
Now run npm run-script build and check /dist. You will notice that there is no map file anymore and if you check index.html it has all the spaces and identation.
Backend serve
If you use some backend framework like Spring, you can simply compile/transpile everything to /src/main/resources/static or if you use Play Framework compile/transpile everything to /public when in production mode. Or to be more generic, compile/transpile everything from /dist to the the directory dedicated for static files in your backend engine/framework when in prod mode.
Imagine you have a directory named webapp in the root of you Spring app, and everything that was done in this whole tutorial is inside /webapp, so webpack.config.js is not in the root, then you have to adjust your output:
...
output: {
  filename: "main.[hash].js",
  path: path.resolve(__dirname, isProd ? "../src/main/resources/static" : "dist")
},
...
For Playframerwork it is the same, it has to go back one level(if you use the same webapp structure) to put everything in /public directory:
...
output: {
  filename: "main.[hash].js",
  path: path.resolve(__dirname, isProd ? "../public: : "dist")
},
...
If this is your reality, ignore installation of serve and change where output.path in webpack.config.js puts the content after npm run-script build:prod.
Testing your frontend
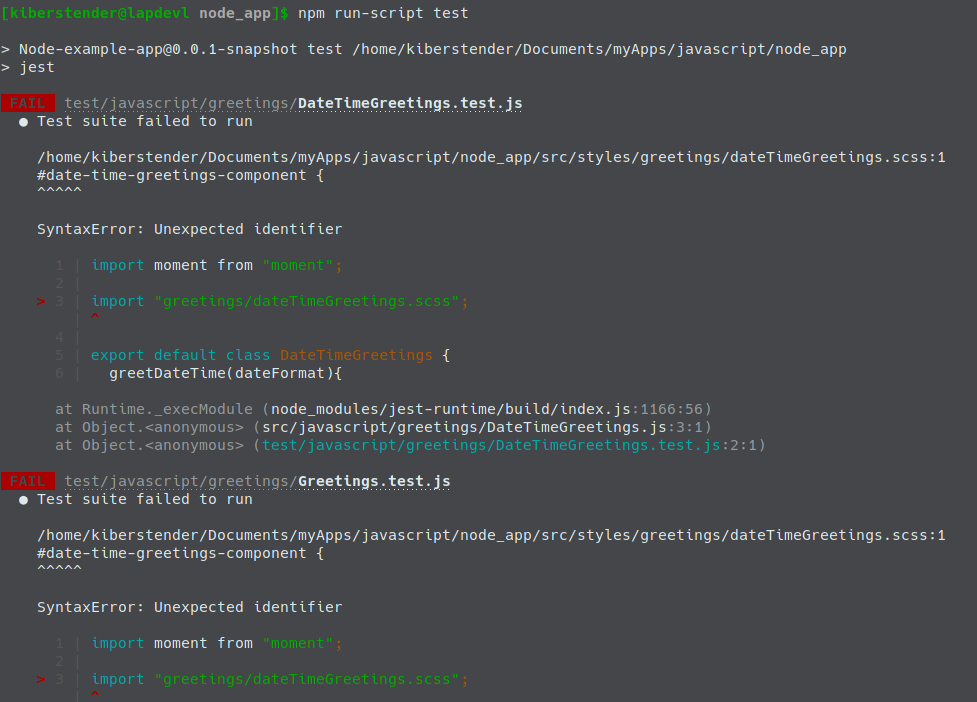
And here we are again, changing the tests to reflect the new code. If you try to run them right now you will see that they are broken because Jest cannot recognize the Sass syntax when importing our .scss files:
To fix that, it is needed to tell Jest to whatever non-Javascript file imported, to change it's code to a dummy empty object ({}). So a stub file is created for all CSS/SASS/LESS files that might be imported in the code. Go to /test/ and create a new directory named jest_stub, now inside this new directory create a file named CssStub.js and put the following content:
module.exports = {};
Now open /jest.config.js and add a new property named moduleNameMapper with the following value:
module.exports = {
  "moduleDirectories": ...,
  "moduleNameMapper": {
    "^.+\\.(css|scss|less)$": "<rootDir>/test/jest_stub/CssStub.js",
  }
}
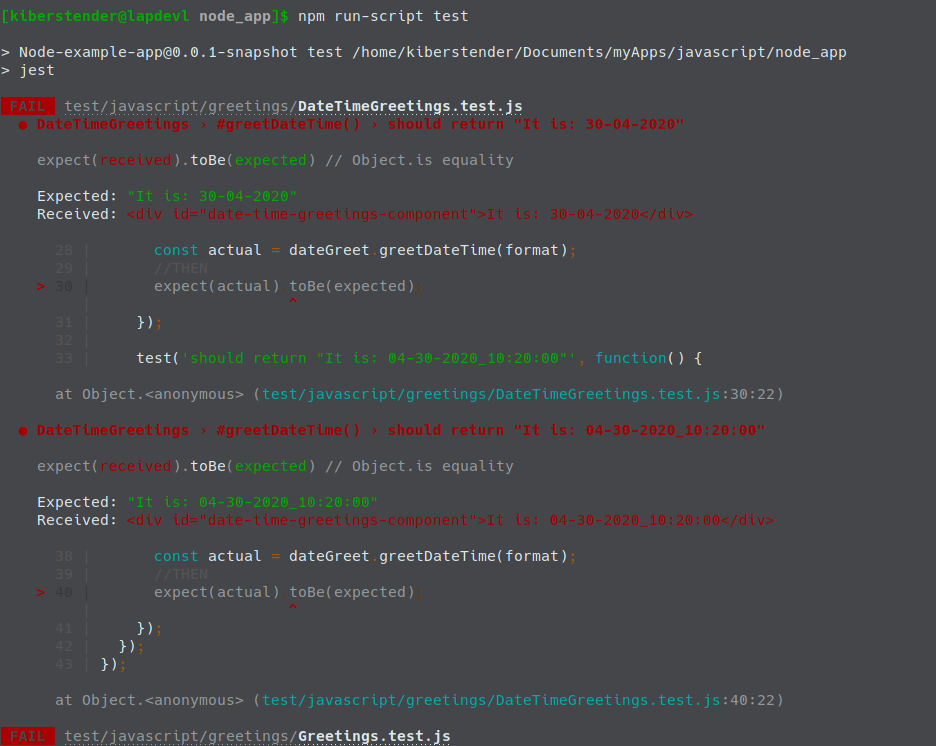
Now if you run the tests again the import problem is no more and we now there are problems because the suite tests were expecting the classes to return Strings but they are returning HTML Node objects now:
Now to fix that it is needed to use HTML Node method innerHTML in the expected function. Let's first fix /test/javascript/greetings/DateTimeGreetings.test.js as this is the easiest test suite:
...
test('should return "It is: 30-04-2020"', function() {
  ...
  //THEN
  expect(actual.innerHTML).toBe(expected);
});

test('should return "It is: 04-30-2020_10:20:00"', function() {
  ...
  //THEN
  expect(actual.innerHTML).toBe(expected);
});
...
Now /test/javascript/greetings/Greetings.test.js is going to be fixed. As this suite test has to mock DateTimeGreetings class, it cannot force it to return a String. Even though I said that when mocking you can force the class to return anything you want, one might not change the original type that the function that is being mocked returns. This is because, for example, mainDiv.appendChild does not accept String as a parameter, so it has to create an HTML Node instance to use in sinon.mock(...)returns:
...
const dateTimeGreetNode = document.createElement("div");
dateTimeGreetNode.setAttribute("id", "date-time-greetings-component");
dateTimeGreetNode.append("It is: April 30rd 2020, 10:20:00 pm");
beforeEach(function(){
sinon
.mock(DateTimeGreetings.prototype)
.expects("greetDateTime")
.withExactArgs("MMMM Do YYYY, h:mm:ss a")
.returns(dateTimeGreetNode);
});
...
test(`should return "Hello Mr/Ms NodeJS Dev\\nIt is: April 30rd 2020, 10:20:00 pm"`, function() {
//GIVEN
const expected = `Hello Mr/Ms NodeJS Dev<div id="date-time-greetings-component">It is: April 30rd 2020, 10:20:00 pm</div>`;
//WHEN
const actual = greetDev.greet();
//THEN
expect(actual.innerHTML).toBe(expected);
});
test(`should not return "Hello Mr/Ms NodeJS Dev \\nIt is: April 30rd 2020, 10:20:00 pm"`, function() {
//GIVEN
const expected = `Hello Mr/Ms NodeJS Dev <div id="date-time-greetings-component">It is: April 30rd 2020, 10:20:00 pm</div>`;
//WHEN
const actual = greetDev.greet();
//THEN
expect(actual.innerHTML).not.toBe(expected);
});
...
Now create a test for the new class /src/javascript/App.js in /test/javascript/App.test.js. This test will mock Greetings class:
import sinon from "sinon";
import Greetings from "greetings/Greetings";
import App from "App"
const app = new App();
describe("App", function() {
const dateTimeGreetNode = document.createElement("div");
dateTimeGreetNode.setAttribute("id", "date-time-greetings-component");
dateTimeGreetNode.append("It is: April 30rd 2020, 10:20:00 pm");
const greetingsNode = document.createElement("div");
greetingsNode.setAttribute("id", "greetings-component");
greetingsNode.append("Hello Mr/Ms NodeJS Dev");
greetingsNode.appendChild(dateTimeGreetNode);
beforeEach(function(){
sinon
.mock(Greetings.prototype)
.expects("greet")
.returns(greetingsNode);
});
afterEach(function(){
sinon.restore();
});
describe('#build()', function() {
test(`should return "Greetings Example\\nGreetings Hello Mr/Ms NodeJS Dev\\nIt is: April 30rd 2020, 10:20:00 pm"`, function() {
//GIVEN
const expected = `<h1>Greetings Example</h1><div id=\"greetings-component\">Hello Mr/Ms NodeJS Dev<div id=\"date-time-greetings-component\">It is: April 30rd 2020, 10:20:00 pm</div></div>`;
//WHEN
const actual = app.build();
//THEN
expect(actual.innerHTML).toBe(expected);
});
test(`should not return "Greetings Example\\nHello Mr/Ms NodeJS Dev \\nIt is: April 30rd 2020, 10:20:00 pm"`, function() {
//GIVEN
const expected = `<h1>Greetings Example</h1><div id=\"greetings-component\">Hello Mr/Ms NodeJS Dev <div id=\"date-time-greetings-component\">It is: April 30rd 2020, 10:20:00 pm</div></div>`;
//WHEN
const actual = app.build();
//THEN
expect(actual.innerHTML).not.toBe(expected);
});
});
});
It is done, the tests are fixed and now if you run all of them, they should pass. But there is still something missing... Something to show that it is really right. An integration test is needed to see if the HTML in a browser is really modified to what we expect it to be modified. As for now it is only checked what the functions return but that do not necessarily means that it would work in a real browser. So how to check it? Jest comes bundled with a library named JSDom. This library fakes a web browser so it can be used on the tests to check if a button was fired, if this fire button action changed something expected to change, if changed it correctly, and so on and so forth.
So we are going to create our first Integration Test. We will only fake the date because of the problem with date and time being constant and let the rest happen automatically without mocking anything and then check if our root ID div has changed accordingly. First create the file /test/javascript/AppIntegration.test.js and add the following content:
import sinon from "sinon";

describe("AppIntegrationTest", function() {
  const clock = date => sinon.useFakeTimers(Date.parse(date));
  const mockdate = "30 Apr 2020 10:20:00"

  beforeEach(function(){
    clock(mockdate);
  });

  afterEach(function() {
    clock(mockdate).restore();
  });

  test("Check integration of all parts", function(){
    //GIVEN
    document.body.innerHTML = `<!doctype html><html><body><div id="root"></div></body></html>`;
    const expected = `<div id="greetings-example"><h1>Greetings Example</h1><div id="greetings-component">Hello Mr/Ms Node Dev<div id="date-time-greetings-component">It is: April 30th 2020, 10:20:00 am</div></div></div>`;

    //WHEN
    require("../../src/index.js");

    //THEN
    expect(document.querySelector("#root").innerHTML).toBe(expected);
  });
});
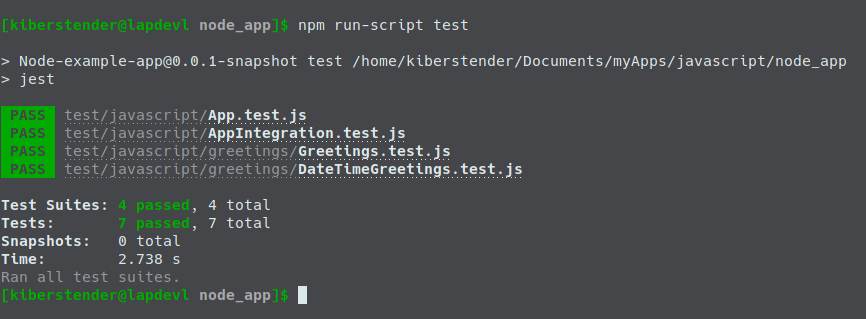
And voi la, a working integration test. As I said nothing was mocked but the date time in our system, otherwise, this test would fail even before the first run as the time that would put in the expected constant would be different 1ms later. Now run and see the result:
* Don't you ever say HTML is a language in an interview. EVER!
Conclusion
In this post we learned how Webpack works to make static frontend application. We added SASS, Boostrap, we hashed our js files to take proper advantage of browser cache mechanism, we learned how to control the environment, we improved our tests again and added a new Integration test. If you need or want to see the whole code of this post please clone this repo and check out the branch named webpack_frotend. If you for some reason speaks portuguese and feel that you would understand this post better in this language feel free to go the Brazilian Portuguese version of this page